The calendar says it's March, but Mother Nature hasn't even thought about spring yet here in Chicago. It even snowed yesterday just to remind us we've still got a good 6 to 8 weeks to go before the weather turns warm. I've experienced colder, snowier winters here, but the longer I live in Chicago, the harder they are to slog through. I know I suffer from seasonal affective disorder, and that combined with several weeks-long stretches of single digit temperatures in January and February made getting ready for NaNoPaiMo a challenge for me. Not only was it too cold to spray primer or fixative, the constant cold grey gloom was downright exhausting. Alas, hibernating until May doesn't pay the bills.
NaMoPaiMo is an event meant to encourage people to paint, especially people who are new to the hobby or who have never tried painting a model before. As someone who's been painting for a number of years, I feel like a bit of an imposter participating, especially when I have been steadily painting and finishing models this last year in order to clear out my backlog of commissions. Nonetheless, I needed a bit of a pick-me-up, and I had a blank copy of one of my new favorite molds just begging for some love, so I decided to go with a challenging color again this year to see if I could improve my techniques.
Greys, whether light, dark, medium, or flea-bitten, have always been the hardest colors for me to paint. I have experimented with airbrushing them, hand-painting them, pasteling them, and combinations of all three with varying success. In the last year or so, I have figured out a technique combining pastels and airbrushing with a little bit of hand-painting that I think works reasonably well. I would still like to finesse the shape and placement of my dapples, but this is definitely an improvement on past attempts.
After priming the model, I base coated it in soft white paint. I then used an old, worn brush to apply black pastel dust. (In this case, it was technically charcoal dust because I ran out of proper black pastels. The pastels are a tad softer and easier to blend, but charcoal sticks work nearly as well.)
I then used an eraser pencil to create dapples...
Which I blended a bit with the worn brush and a little more pastel dust.
I then sealed my work with Krylon fixative and moved on to the barrel using the same technique.
With each body section...
I repeated the same steps...
And I used the eraser pencil to gently tease out highlights in the muscle grooves, elbows, flanks, and other "warm" areas where horses tend to grey out first.
Once I had most everything but the head pasteled, I came back over the topline, shoulders, and rump with another layer to pastels to darken them up and add some contrast. I did the legs as well, but forgot to snap a photo.
I then airbrushed a very fine layer of dark grey and then a bit of black to add a little more of a contrast than I could achieve with just pastels.
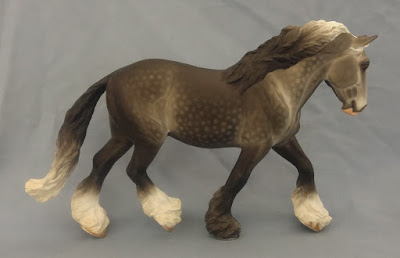
I decided to go with one dark leg to give him a bit of character. I hand-painted the mane and tail, hooves, and face markings...
and voila! I'm pretty pleased with him. I managed to finish him up with
about an hour and half to spare on February 28th, so right down to the
wire in typical fashion. (These photos were taken late at night with soft lighting, so the color's a bit off.)
.
Having tried this technique a couple of times now, I have more ideas for tweaks and refinements, especially to the dappling. More practice is warranted, maybe on a Proud Arabian Mare?
I am still hard at work finishing up commissions---check out my Instagram feed for more pictures of models on their way home---and I will find some time to blog about them here, too, in the near future.
Onward!


No comments:
Post a Comment